A few of the more common Edge related issues are Microsoft Edge Not Working in Windows 10, Hmm, we can’t reach this page error in Microsoft Edge, Blue Screen error in Microsoft Edge, etc. Another widely encountered issue is the ‘Can’t Connect Securely to this page’. The issue is predominantly experienced after installing the Windows 10 1809 update and is accompanied by a message that reads “This might be because the site uses outdated or unsafe TLS protocol settings. If this keeps happening, try contacting the website’s owner”. The ‘Can’t Connect Securely to this page’ issue isn’t unique to Edge either, it can also be encountered in Google Chrome, Mozilla Firefox, and other web browsers. In this article, we will be first enlightening you about the cause of the issue and then provide a couple of solutions that have been reported to resolve it.
What causes the “Can’t connect securely to this page” error?
Reading the error message is enough to point you towards the culprit (TLS protocol settings) for the error. Although, most average users might be unaware of what TLS really is and what it has to do with their internet browsing experience.
What causes the “Can’t connect securely to this page” error? Fix Can’t Connect Securely to this Page Error in Microsoft Edge Method 1: Clear Edge Cookies and Cache Files Method 2: Enable Transport Layer Security (TLS) protocols Method 3: Enable Display Mixed Content Method 4: Disable Antivirus/Ad Blocking Extensions Temporarily Method 5: Update Network Drivers Method 6: Change DNS Settings Method 7: Reset your Network Configuration
TLS stands for Transport Layer Security and is a set of protocols used by Windows to securely communicate with the websites you try to access. The “Can’t connect securely to this page” error pops up when these TLS protocols aren’t configured correctly and do not match with a particular site’s server. The mismatch and, therefore, the error is most likely to occur if you are trying to access a really old website (one that still uses HTTPS instead of the newer HTTP technology) that has not been updated for ages. The error may also occur if the Display Mixed Content feature on your computer is disabled while the website you are trying to load contains both HTTPS and HTTP content.
Fix Can’t Connect Securely to this Page Error in Microsoft Edge
The “Can’t connect securely to this page” issue in Edge can be easily resolved by properly configuring the TLS protocol settings on most computers and by enabling Display Mixed Content in some systems. While some users might need to update their network drivers (network drivers if corrupt or outdated can prompt the error), reset their existing network configuration, or change their DNS settings. A few easy solutions like clearing the browser’s cache files & cookies and disabling any third-party antivirus program temporarily have also been reported to solve the issue, albeit not always.
Method 1: Clear Edge Cookies and Cache Files
While this may not resolve the “Can’t connect securely to this page” error for most users, this happens to be the easiest solution and solves a number of browser-related issues. Corrupt cache and cookies or an overload of them often lead to browser issues and it is advised to regularly clear them up.
As obvious, we start by launching Microsoft Edge. Double-click on Edge’s desktop (or taskbar) shortcut icon or search for it in the Windows search bar (Windows key + S) and press the enter key when the search returns.
Next, click on the three horizontal dots present at the top-right of the Edge browser window. Select Settings from the ensuing menu. You can also access the Edge settings page by visiting the edge://settings/ in a new window.
Switch to the Privacy and services settings page.
Under the Clear Browsing Data section, click on the Choose what to clear button.
In the following pop-up, tick the box next to ‘Cookies and other site data’ and ‘Cached images and files’ (Go ahead and tick Browsing history too, if you don’t mind deleting it.)
Expand the Time Range drop-down and select All Time.
Finally, click on the Clear now button. Restart the web browser and try opening the problematic website again.
Method 2: Enable Transport Layer Security (TLS) protocols
Now, onto the thing that primarily causes the error – TLS protocols. Windows allows the user to choose between four different TLS encryption settings, namely, TLS 1.0, TLS 1.1, TLS 1.2, and TLS 1.3. The first three are enabled by default and can prompt errors when disabled, either accidentally or on purpose. So we will first be making sure that TLS 1.0, TLS 1.1, and TLS 1.2 encryption settings are enabled. Also, before switching to TLS, Windows made use of the SSL technology for encryption purposes. However, the technology is now obsolete and should be disabled to avoid conflicts with TLS protocols and thus prevent any mishaps.
Press Windows key + R to launch the Run command box, type inetcpl.cpl, and click on OK to open the Internet Properties.
Move to the Advanced tab of the Internet Properties window.
Scroll down the Settings list until you find Use SSL and Use TLS checkboxes.
Ensure the boxes next to Use TLS 1.0, Use TLS 1.1, and Use TLS 1.2 are ticked/checked. If they are not, click on the boxes to enable these options. Also, make sure the Use SSL 3.0 option is disabled (unchecked).
Click on the Apply button at the bottom right to save any changes you might have made and then the OK button to exit. Open Microsoft Edge, visit the webpage, and hopefully, the error won’t appear now.
Method 3: Enable Display Mixed Content
As mentioned earlier, the “Can’t connect securely to this page” can also be caused if a website contains HTTP as well as HTTPS content. The user, in that case, will need to enable Display Mixed Content otherwise, the browser will have problems loading all the contents of the webpage and result in the discussed error.
Open the Internet Properties window by following the method mentioned in the first step of the previous solution.
Switch to the Security tab. Under ‘Select a zone to view or change security settings’, select the Internet (the globe icon), and click on the Custom level… button inside the ‘Security level for this zone’ box.
In the following pop-up window, scroll to find the Display mixed content option (under miscellaneous) and enable it.
Click on OK to exit and perform a computer restart to bring the modifications into effect.
Method 4: Disable Antivirus/Ad Blocking Extensions Temporarily
The real-time web protection (or any similar) feature in third-party antivirus programs can also prevent your browser from loading a certain webpage if it finds the page harmful. So try to load the website after disabling your antivirus. If this does end up solving the “Can’t connect securely to this page” error, consider switching to another antivirus software or disable it whenever you want to access the webpage. Most antivirus applications can be disabled by right-clicking on their system tray icons and then selecting the appropriate option. Similar to antivirus programs, ad blocking extensions can also prompt the error. Follow the below steps to disable any extensions in Microsoft Edge:
Open Edge, click on the three horizontal dots, and select Extensions.
Click on the toggle switch to disable any particular extension. 3. You can also choose to uninstall the extension by clicking on Remove.
Method 5: Update Network Drivers
If enabling the appropriate TLS protocols and Display Mixed Content feature didn’t do the job for you, then it might be the corrupt or outdated network drivers causing the error. Simply update to the latest version of the available network drivers and then try visiting the website. You can either use one of the many third-party drivers updating applications like DriverBooster, etc. or update the network drivers manually through the Device Manager.
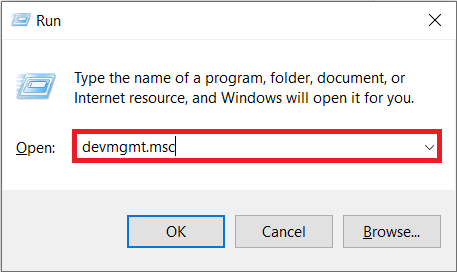
Type devmgmt.msc in the run command box and press enter to launch Windows Device Manager.
Expand Network adapters by clicking on the arrow to its left.
Right-click on your Network adapter and select Update Driver.
In the following window, click on Search automatically for updated driver software.
The most up-to-date drivers will now be automatically downloaded and installed on your computer. Also Read: How to Update Device Drivers on Windows 10
Method 6: Change DNS Settings
To those unaware, DNS (Domain Name System) acts as the phonebook of the internet and translates domain names (for example https://techcult.com) into IP addresses and therefore allows web browsers to load all kinds of websites. However, the default DNS server set by your ISP is often slow and should be replaced with Google’s DNS server or any other trusted server for the best browsing experience.
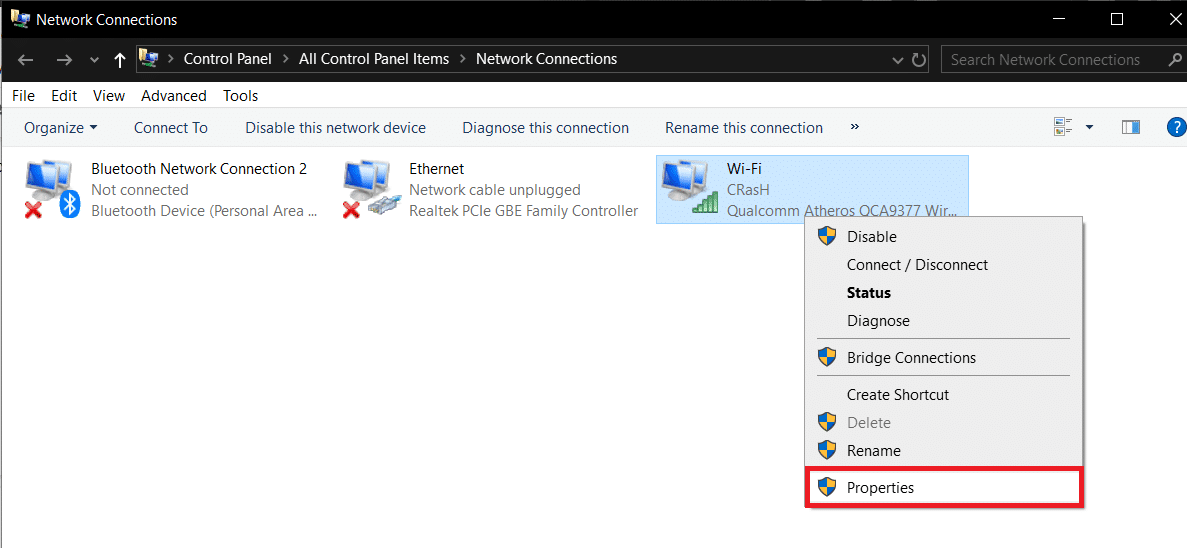
Launch the Run command box, type ncpa.cpl, and click on OK to open the Network Connections window. You can also open the same via the Control Panel or through the Search bar.
Right-click on your active network (Ethernet or WiFi) and select Properties from the ensuing context menu.
Under the Networking tab, select Internet Protocol Version 4 (TCP/IPv4) and click on the Properties button (You can also double-click on it to access its Properties window).
Now, select Use the following DNS server addresses and enter 8.8.8.8 as your Preferred DNS server and 8.8.4.4 as the Alternate DNS server.
Check/tick the box next to Validate settings upon exit and click on OK.
Method 7: Reset your Network Configuration
Finally, if none of the above-explained methods worked, try resetting your network configuration to its default settings. You can do this by executing a couple of commands in an Elevated Command Prompt window.
We will need to open the Command Prompt as an administrator to reset the network configuration settings . To do so, search for Command Prompt in the search bar and select Run as Administrator from the right panel.
Execute the following commands one after the other (type the first command, press enter and wait for it to be executed, type the next command, press enter, and so on):
Recommended:
2 Ways to Cancel YouTube Premium Subscription Fix Common Printer Problems in Windows 10 Fix Microsoft Edge opens multiple windows
We hope one of the above methods helped you get rid of the annoying “Can’t connect securely to this page” error in Microsoft Edge. Let us know which solution worked for you in the comments section below.