Many of us connect a secondary monitor to increase the available screen real estate, have a greater number of application Windows open in the foreground, multitask more efficiently, and for an enhanced gaming experience. As soon as you plug in the HDMI/VGA cable of your second monitor to the CPU, Windows starts automatically setting it up. If it fails to do so, the generic PnP monitor error will be experienced. The error message reads “failed to load hardware monitor driver”. Inside the Device Manager, the newly connected monitor will contain a yellow exclamation mark over it implying that Windows is unable to recognize the device. The issue is most commonly encountered by users who have recently upgraded from Windows 7 or 8 to Windows 10. Other reasons for the Generic PnP Monitor problem are corrupted or incompatible PnP drivers, outdated graphic drivers, missing system files, or faulty connection (cables). Execute the solutions mentioned in this article one after the other until you are successful in resolving the Generic PnP Monitor problem on Windows 10.
Fix Generic PnP Monitor Problem On Windows 10
The problem is primarily caused due to PnP or Graphics card driver issues. Both of these can be resolved by simply uninstalling the current drivers (which are most definitely corrupt or incompatible) and replacing them with the updated ones. You can either use the built-in Device Manager for this purpose or download a third-party driver updating application such as Driver Booster. Other potential solutions to the problem are fixing any corrupt system files and updating to the latest version of Windows.
Fix Generic PnP Monitor Problem On Windows 10 Method 1: Reconnect the Cables Method 2: Uninstall Generic PnP Drivers Method 2: Update Generic PnP Drivers Method 3: Update Graphics drivers Method 4: Run a System File Checker scan Method 5: Update Windows
Method 1: Reconnect the Cables
Firstly, as trivial as it may sound, try reconnecting the monitor’s power and HDMI/VGA cable once again. Before reconnecting, blow some air gently into the ports to remove any dirt that might be clogging the connection. If you have another set of cables handy, use them and check if the same issue arises. 1. Close all your active application windows, click on the Power icon in the Start menu, and select Shutdown. 2. Once the computer has completely shut down, turn off the power switch and carefully disconnect the monitor’s power cable. 3. After 10 minutes, remove the video cable connecting the monitor with your CPU. 4. Leave both the cables disconnected for 10-15 minutes and then plug them back into their respective ports. 5. Start your computer and check if the Generic PnP Monitor issue persists.
Method 2: Uninstall Generic PnP Drivers
As mentioned earlier, users do not need to install drivers for PnP devices such as monitors, they are automatically configured. Whenever Windows fails to recognize/configure a connected device, it installs some generic drivers in an attempt to resolve the issue. Sometimes, these generic drivers will be outdated or not compatible with the hardware and result in the Generic PnP problem. In such a case, users should remove the current drivers and let Windows search for new ones.
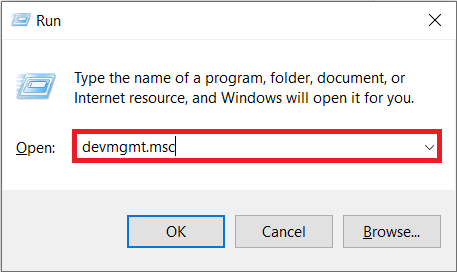
Press Windows key and R to launch the Run command box, type devmgmt.msc, and click on Ok to open the Device Manager. You can also directly search for the same in the Cortana search bar.
In the Device Manager window, either double-click on Monitors or single click on the arrow to its right to expand.
Right-click on Generic PnP Monitor and select Uninstall device.
A warning pop-up requesting confirmation will appear. Click on Uninstall to confirm.
Once the drivers are uninstalled, expand the Action menu, and choose the Scan for hardware changes option.
Restart your computer and Windows will automatically install the drivers again. Also Read: How to Fix Monitor Screen Flickering Issue
Method 2: Update Generic PnP Drivers
If the drivers installed by the OS do not solve the issue, users should manually update them. You can also download the most up-to-date drivers from the manufacturer’s website and install them like you would install any other application (.exe) file.
Follow steps 1 and 2 of the previous method, i.e, open Device Manager, and expand the Monitors category.
Right-click on the Generic PnP Monitor select Update Driver.
In the following window, choose Search automatically for drivers. Windows will scan the world wide web for any new & updated drivers available for your computer and install them automatically.
If Windows fails at finding updated driver files, click on Browse my computer for drivers.
On the next window, click on Let me pick from a list of available drivers on my computer.
Tick the box next to Show compatible hardware. Select the Generic PnP Monitor driver and click on Next to install them. Wait for the installation process to finish and close all the active Windows.
Method 3: Update Graphics drivers
Apart from updating the PnP drivers, many users have also solved the issue by updating their graphics card drivers. The process is similar to updating PnP drivers.
Open Device Manager once again and expand the Display Adapter category.
Right-click on your computer graphics card and select Update driver.
Again, Select Search automatically for drivers and let Windows look for updated drivers.
Restart the computer after updated drivers have been installed.
Method 4: Run a System File Checker scan
On rare occasions, a new Windows update may corrupt certain system files and prompt a number of issues. A virus attack or a malicious application can also be the potential culprits messing around with system files and drivers. To perform an antivirus scan first, uninstall unknown malware, and then use the system file checker utility to fix any corrupt or missing system file.
Search for Command Prompt in the Start Search bar, Right-click on the search result, and select Run as Administrator.
Type sfc /scannow in the elevated window and press enter to execute the command.
The verification will take more than a couple of minutes to reach 100%, do not close the Command Prompt window before the verification is completed. Once the scan concludes, Restart the computer. Also Read: How to Remove Malware from your PC in Windows 10
Method 5: Update Windows
Finally, if the issue is being caused due to any bug in the current version of Windows on your computer, you will need to either revert back to a previous version or update it to the latest one.
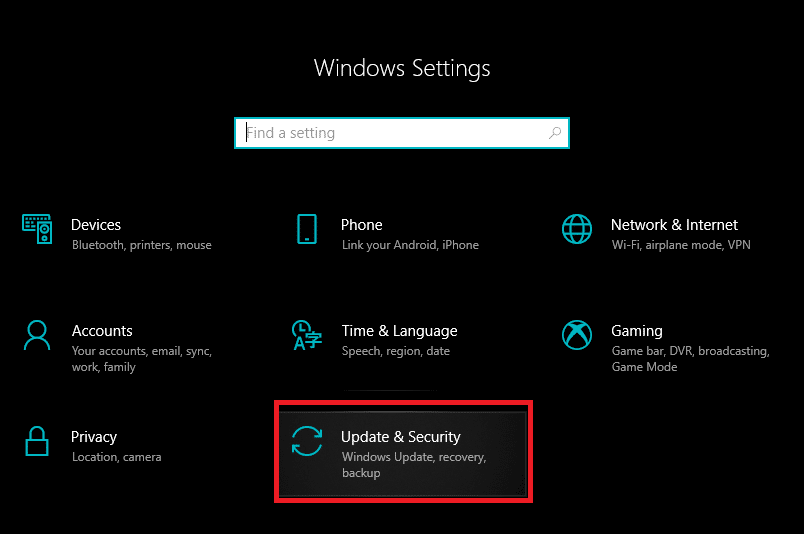
Press the Windows key + I to open Settings and Click on Update & Security.
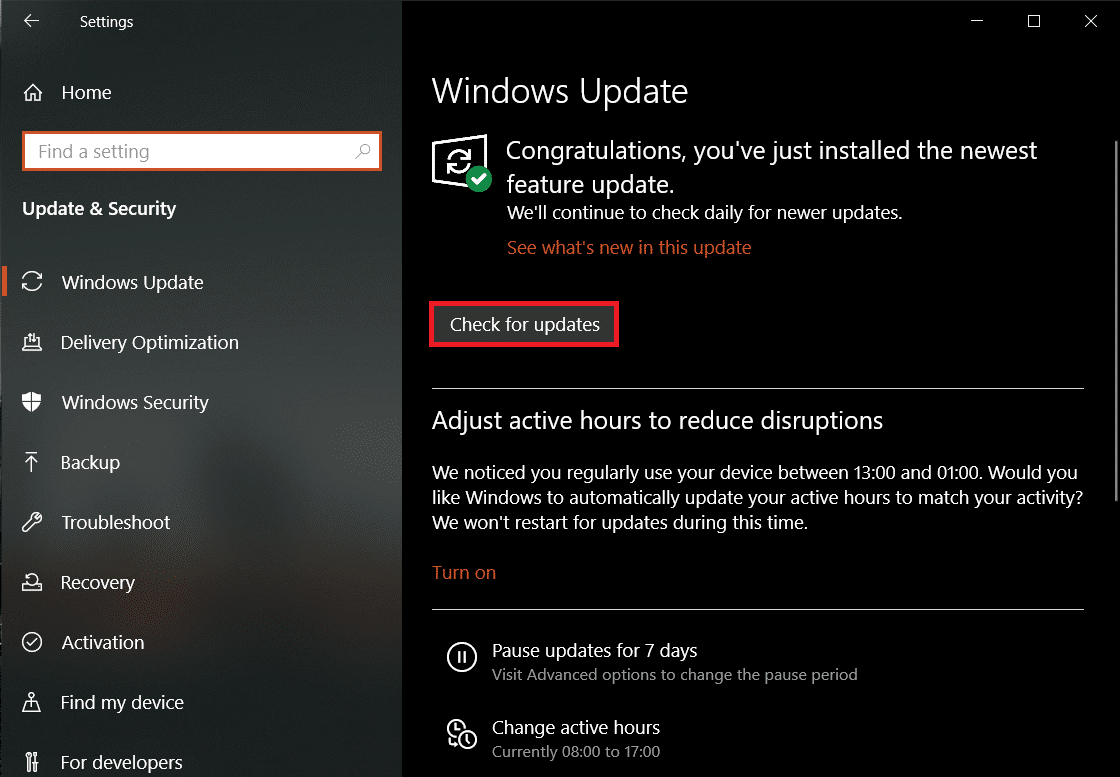
On the Windows Update tab, click on Check for updates button. If there are any new OS updates available, download and install them as soon as possible.
Recommended:
How to Change the Primary & Secondary Monitor on Windows Fix Second Monitor Not Detected in Windows 10 How to Fix Corrupted Registry in Windows 10
We hope this article was helpful and you were able to fix the Generic PnP Monitor problem on Windows 10. For any more help on this topic or anything else for that matter, drop in a Hi! in the comments below.