How to Fix Ubisoft Connect Not Working on Windows 10
You are advised to read this section thoroughly to identify the reason that causes the error message. You can easily fix the error yet finding out the root cause may take time to follow the troubleshooting steps accordingly. Hence, analyze the factors that lead to the error messages with Ubisoft on Windows 10 as discussed below.
How to Fix Ubisoft Connect Not Working on Windows 10 Method 1: Restart PC Method 2: Restart Your Router Method 3: Close Background Processes Method 4: Run Network Troubleshooter Method 5: Troubleshoot ipconfig Through Command Prompt Method 6: Remove Winsock Catalog Entries Method 7: Run SFC and DISM Scans Method 8: Disable VPN Method 9: Disable IPV6 Method 10: Change DNS Server Address Method 11: Change Data & Time Format Method 12: Update or Rollback Network Drivers Method 13: Reset the hosts file Method 14: Update Windows Method 15: Perform Network Reset Method 16: Contact Ubisoft Support
Network Issues: If you have any interruptions in your network connection or network settings, you may face the said problem. There are plenty of ways to troubleshoot network settings, as discussed in the article. Incompatible programs: An executable file in ProgramData may cause Ubisoft Service Is Currently Unavailable error message. Try deleting it and closing all unwanted applications and programs running in the background to fix the same. Date & Time Settings: Many online gaming servers depend on the perfect date and timing settings, especially if they are worldwide in operation. If you have an incorrect date and time setting, you will face the error. IPv6 Incompatibility Issues: If you use Internet Protocol Version 6 enabled on your PC, you may face the said problem. To fix it, disable the protocol temporarily and check if this works.
Here are a few troubleshooting methods to fix the error message. Follow them to attain the best results.
Method 1: Restart PC
Before trying the rest of the methods, you are advised to reboot your system by following the given steps.
Navigate to the Desktop by pressing Win + D keys simultaneously.
Now, press Alt + F4 keys together. You will see Shut Down Windows pop-up window as shown below.
Now, click on the drop-down box and select the Restart option.
Finally, hit Enter or click on OK to reboot your system.
Method 2: Restart Your Router
Restarting the router will re-initiate the network connectivity, and few users have reported that all the changes marked in the configuration settings will be effective in action when you restart the router. Therefore, follow the below-mentioned steps to restart your router.
Find the Power button at the back of your router.
Press the button once to turn it off.
Now, disconnect your Router power cable and wait until the power is entirely drained from the capacitors.
Then, reconnect the power cable and switch it on after a minute.
Wait until the network connection is re-established and try signing in again. Also Read: Fix Computers Not Showing Up on Network in Windows 10
Method 3: Close Background Processes
There may be plenty of applications that run in the background. This will increase the CPU and memory space, thereby affecting the performance of the system. Follow the below-mentioned steps to close the background tasks.
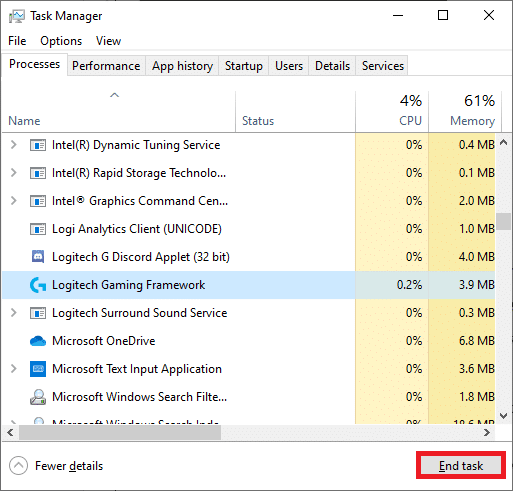
- Launch Task Manager, press the Ctrl + Shift + Esc keys at the same time.
- Locate and select the unwanted background processes using high Memory.
- Then, click End task, as shown highlighted.
Method 4: Run Network Troubleshooter
Running the Network Adapter Troubleshooter will resolve any glitches in the Ethernet connection, thus resolving the Uplay not available error. This method is applicable not only for Windows 7 but also for Windows 7 & 8.1.
Press Windows + I keys simultaneously to launch Settings.
Click on the Update & Security tile, as shown.
Go to Troubleshoot menu from the left pane and locate Find and fix other problems in right pane.
Select Network Adapter troubleshooter and click on Run the troubleshooter button shown highlighted.
Wait for the troubleshooter to detect and fix the problem. Once the process is complete, follow on-screen instructions and restart your PC. Also Read: Fix Windows could not automatically detect this Network’s Proxy settings
Method 5: Troubleshoot ipconfig Through Command Prompt
Still, if you face Uplay not available error even after running the Network troubleshooter, this indicates you have network conflicts. You can fix Ubisoft connect not working issue by using a few commands as instructed below.
Hit the Windows key, type Command Prompt and click on Run as administrator.
Now, type the following commands one by one and hit Enter.
Finally, wait for the process to be completed and check if the issue is resolved now.
Method 6: Remove Winsock Catalog Entries
Winsock enables your OS to set a TCP/IP connection whenever you connect to the network. Yet, several entries are created for established connections leading to Uplay not available error. You can clear them by using the below-discussed instructions.
Launch Command Prompt as administrator.
Now, type netsh winsock command and hit Enter key.
Wait for the notification on Winsock reset and check if Ubisoft connect not working issue is resolved. Also Read: Fix Ethernet Doesn’t Have a Valid IP Configuration Error
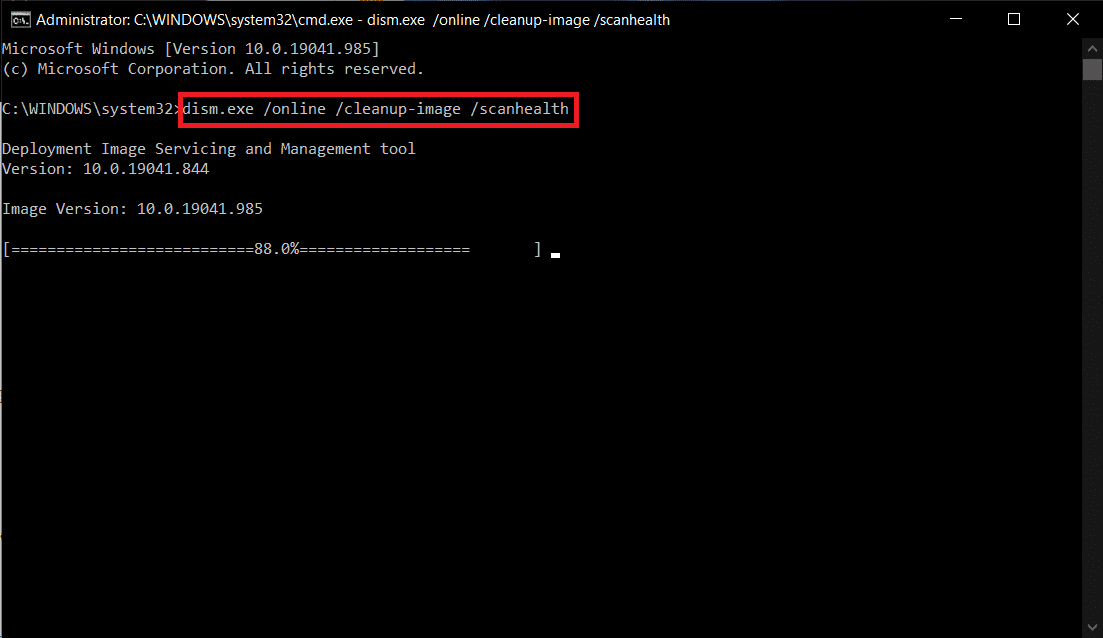
Method 7: Run SFC and DISM Scans
Windows 10 users can automatically scan and repair their system files by running System File Checker (SFC) and DISM Scans. In addition, it is a built-in tool that lets the user delete files and fix the error message. Then, follow the below-mentioned steps to implement the same.
Open Command Prompt as administrator.
Click on Yes in the User Account Control prompt.
Type the command: sfc /scannow and press Enter key to run the System File Checker scan.
Note: A system scan will be initiated and it will take a couple of minutes to finish. Meanwhile, you can continue performing other activities but be mindful of not accidentally closing the window. After completing the scan, it will show either of these messages:
Windows Resource Protection did not find any integrity violations. Windows Resource Protection could not perform the requested operation. Windows Resource Protection found corrupt files and successfully repaired them. Windows Resource Protection found corrupt files but was unable to fix some of them.
- Once the scan is finished, restart your PC.
- Again, launch Command Prompt as administrator and execute the given commands one after the other: Note: You must have a working internet connection to execute DISM commands properly.
Method 8: Disable VPN
Follow these steps to disable VPN to fix Ubisoft connect not working issue.
Hit the Windows key, type VPN Settings in the Windows Search Bar, and click on Open.
In the Settings window, select the Connected VPN (e.g. vpn2).
Click on the Disconnect button.
Now, switch Off the toggle for the following VPN options under Advanced Options:
Allow VPN over metered networks Allow VPN while roaming
Check if Ubisoft connect not working issue persists or not. Also Read: What is a VPN and how it works?
Method 9: Disable IPV6
Although IPv6 has added advantages over IPv4, there are a few limitations to it. However, when your system does not adapt IPv6 protocol, then you will face Uplay not available error. Hence, you are advised to disable IPv6 as instructed below. Note: Here, steps are demonstrated for a Wi-Fi connection. If you are using an Ethernet connection, choose the settings accordingly.
Hit the Windows key, type view network connections, and click on Open.
Now, right-click on your active network adapter and click on Properties as shown.
Here in the Wi-Fi Properties window, uncheck the Internet Protocol Version 6(TCP/IPv6) option.
Finally, click on OK to save the changes and check if the issue is resolved. Note: If you use multiple network connections, then follow the given steps:
Navigate to the Network Connections window.
Now right-click on the adapter and select the Disable option.
Likewise, disable all the additional connections except the one you are using and check if Uplay not available issue is resolved.
Method 10: Change DNS Server Address
IPv4 address has larger packets, and hence your network connection will be stabilized when you change them. Therefore, follow the below-mentioned steps to change the IPv4 address to fix Ubisoft connect not working issue.
Press the Windows key, type Control Panel and click on Open.
Set View by: > Large icons and click on the Network and Sharing Center from the list.
Next, click on the Change adapter settings hyperlink present in the left pane.
Right-click on your current network connection (e.g. Wi-Fi) and select Properties, as depicted.
5: Under This connection uses the following items: list, locate and click Internet Protocol Version 4 (TCP/IPv4).
Click the Properties button, as highlighted above.
Here, select Use the following DNS server addresses: option and enter the following: Preferred DNS server: 8.8.8.8 Alternate DNS server: 8.8.4.4
Click on OK to save changes. Also Read: Fix The content can’t be displayed because the S/MIME control isn’t available
Method 11: Change Data & Time Format
To avoid Ubisoft connect not working error, try to match the online internet server timings with your PC settings. It is very simple and here is how to do it.
Launch Control Panel by typing it in the search bar.
Open the best results and click on Change date, time, or number formats under Clock and Region as shown.
Here, check the Format is set to your geographic location and ensure if the Date and time formats are set to the correct settings as shown.
Finally, click on Apply and OK to save the changes if any.
Method 12: Update or Rollback Network Drivers
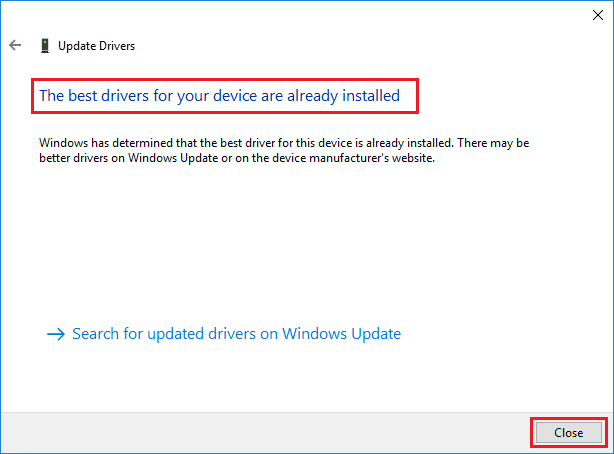
If the current drivers in your system are incompatible or outdated with the game files, then you may face Ubisoft connect not working issues. Therefore, you are advised to update your device and drivers to prevent Uplay not available problem. Option 1: Update Driver
Type Device Manager in the Windows 10 search menu.
Double-click on Network adapters to expand it.
Right-click on your wireless network driver (e.g. Qualcomm Atheros QCA9377 Wireless Network Adapter) and select Update driver, as depicted below.
Next, click on Search automatically for drivers to automatically download and install the best available driver.
5A. Now, the drivers will update and install to the latest version, if they are not updated. 5B. If they are already in an updated stage, the message saying The best drivers for your device are already installed will be shown.
Click on the Close button to exit the window and restart your PC. Check if you have a fixed Ubisoft connect not working on Windows 10. Option 2: Roll Back Driver Updates
Go to Device Manager > Network adapters as earlier.
Right-click on the Wi-Fi driver (e.g. Intel(R) Dual Band Wireless-AC 3168) and select Properties, as depicted.
Switch to the Driver tab and select Roll Back Driver, as highlighted. Note: If the option to Roll Back Driver is greyed out, it indicates that your computer does not have the pre-installed driver files or it has never been updated.
Provide your reason for Why are you rolling back? in Driver Package rollback. Then, click on Yes, as illustrated below.
- Then, click on OK to apply this change. Finally, restart your PC. Also Read: How to Fix Uplay Fails to Launch
Method 13: Reset the hosts file
Many times game host files get affected during bad networking especially for online games and launcher connectivity. If you’re facing Ubisoft connect not working issue, then the host files of the system might be affected, and here’s how you can reset it:
Hit the Windows + E keys together to open File Explorer.
Click on the View tab and check the Hidden items option.
Then go to the following path from the address bar. C:\Windows\System32\drivers\etc
Here, right-click on the hosts file and select Open with > Notepad.
Now, replace the text in the Notepad with the following text.
Finally, hit Ctrl + S keys simultaneously to save the file.
Method 14: Update Windows
Here are the steps to update Windows to fix Ubisoft connect not working issue.
Press Windows + I keys simultaneously to launch Settings.
Click on the Update & Security tile, as shown.
In the Windows Update tab, click on Check for updates button.
4A. If a new update is available, then click Install Now and follow the instructions to update.
4B. Otherwise, if the Windows is up-to-date, then it will show You’re up to date message.
After updating Windows, check if Uplay not available error persists or not. Also Read: How to Fix Origin Error 9:0 in Windows 10
Method 15: Perform Network Reset
If you did not attain any fix for Ubisoft connect not working issue by any of these methods, then try resetting the network settings as discussed below to fix Uplay not available error.
Press Windows + I keys together to open Windows Settings.
Click on Network & Internet option, as highlighted.
Scroll down and click on Network reset at the bottom of the screen.
Next, click Reset now.
Once the process is completed successfully, your Windows 10 PC will restart.
Method 16: Contact Ubisoft Support
The last method to fix Uplay not available error is to seek help from Ubisoft Support Team. Go to the Support page and search for your error.
Recommended:
How to Play OGG Files on Windows 10 Fix Kodi Update Failed How to Turn Off Firestick Fix Steam is Slow in Windows 10
We hope that this guide was helpful, and you could fix Ubisoft connect not working issue. Let us know which method worked for you the best. Also, if you have any queries/suggestions regarding this article, then feel free to drop them in the comments section.