The Autorun.inf was abused by hacker community and is still used to execute malicious program automatically on the user machine without letting the user know about it. If you try to delete the autorun.inf and you receive the “Acces denied” or “You need permission to perform this action” error message then there are two possibilities: One the file is infected by virus & the virus has locked the file so that you can’t delete or modify the file in any way, other is that the antivirus has locked the file so that any virus or malware can’t infect the file. It doesn’t really matter which of the above case you have if you want to delete the corrupted autorun.inf file then there are various possible methods available and the next time you plug in your device the autorun.inf file will be automatically created.
How to delete Autorun.inf file
Make sure to create a restore point just in case something goes wrong.
How to delete Autorun.inf file Method 1: Backup Data and Format the Drive Method 2: Take ownership of the file Method 3: Remove autorun.inf file by using the command prompt Method 4: Delete Autorun.inf file in safe mode Method 5: Run CCleaner and Malwarebytes
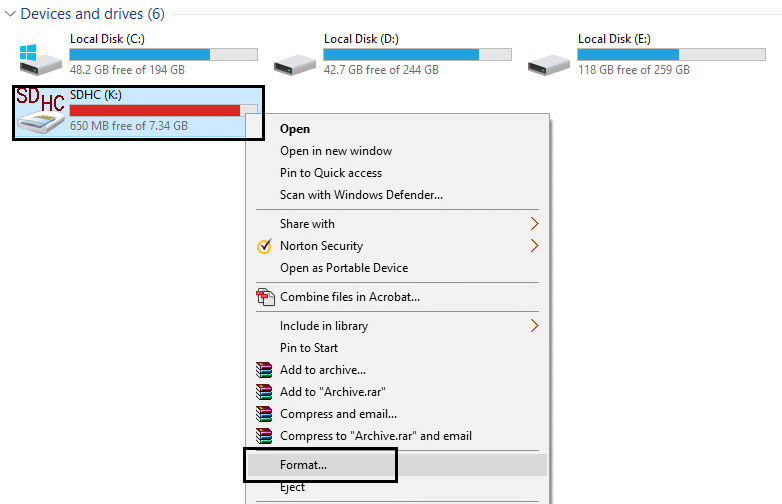
Method 1: Backup Data and Format the Drive
The easiest way to remove autorun.inf file is to copy all the data to your hard disk and then format the drive containing the autorun.inf.
Method 2: Take ownership of the file
1.Press Windows Key + X then select Command Prompt (Admin).
2.Type the following command in the cmd and hit Enter: Note: Just replace the drive letter G: with your own. takeown /f G:\autorun.inf
3.Once you have taken the ownership through the above command go to your removable drive. 4.Permanently delete AutoRun.inf file from the removable drive.
Method 3: Remove autorun.inf file by using the command prompt
1.Press Windows Key + X then select Command Prompt (Admin). 2.Type the following command in the cmd and hit Enter: cd G: attrib -r -h -s autorun.inf del autorun.inf
3.If you get access denied error while running the above command then you need to take ownership of the file. 4.Run this command in cmd: takeown /f G:\autorun.inf
5.Then again run the above command and see if you’re able to run it. 6.If you still get the access denied error then right-click on Autorun.inf file and select Properties. 7.Switch to Security tab and click Advanced.
8.Now click Change under Owner.
9.Type Everyone under Enter the object name to select field and then click on Check Names.
10.Click Apply Followed by OK. 11.Again go to Advanced Security Settings and then click Add.
12.Click on Select a principal and then type Everyone and click on Check Names.
13.Click OK and under basic permission select Full Control then click OK.
14.Next, click Apply followed by OK.
15.Now again try to run the above command which was giving access denied error.
Method 4: Delete Autorun.inf file in safe mode
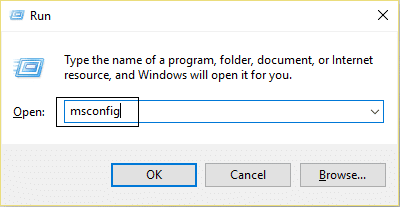
1.Press Windows Key + R then type msconfig and hit Enter to open System Configuration.
2.Switch to boot tab and check mark Safe Boot option.
3.Click Apply followed by OK. 4.Restart your PC and system will boot into Safe Mode automatically. 5.Take permission if you need to by following the above method. 6.Then open cmd and type the following command: cd G: attrib -r -h -s autorun.inf del autorun.inf
4.Reboot your PC normally.
Method 5: Run CCleaner and Malwarebytes
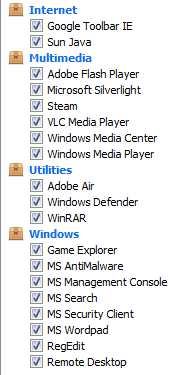
1.Download and install CCleaner & Malwarebytes. 2.Run Malwarebytes and let it scan your system for harmful files. 3.If malware is found it will automatically remove them. 4.Now run CCleaner and in the “Cleaner” section, under the Windows tab, we suggest checking the following selections to be cleaned:
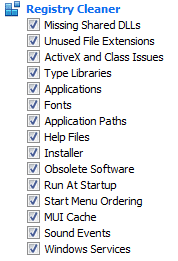
5.Once you’ve made certain the proper points are checked, simply click Run Cleaner, and let CCleaner run its course. 6.To clean your system further select the Registry tab and ensure the following are checked:
7.Select Scan for Issue and allow CCleaner to scan, then click Fix Selected Issues. 8.When CCleaner asks “Do you want backup changes to the registry?” select Yes. 9.Once your backup has completed, select Fix All Selected Issues. 10.Restart your PC to save changes. Recommended for you:
Fix Can’t maximize programs from taskbar Fix System Restore did not complete successfully File Explorer does not highlight selected files or folders 5 Ways to enable Thumbnail preview in Windows 10
That’s it you have successfully learned How to delete Autorun.inf file if you still have any questions regarding this guide then feel free to ask them in the comment’s