Bitlocker was first introduced in Windows Vista and its graphical interface only allowed the users to encrypt the operating system volume. Also, some of its features could only be managed using the command prompt. However, that has changed since and users can encrypt other volumes too. Starting from Windows 7, one can also use Bitlocker to encrypt external storage devices (Bitlocker To Go). Setting up Bitlocker can be a little daunting as you face the fear of locking yourself out of a particular volume. In this article, we will be walking you through the steps to enable Bitlocker encryption on Windows 10.
Prerequisites for enabling Bitlocker While native, Bitlocker is only available on certain versions of Windows, all of which are listed below:
Pro, Enterprise, & Education editions of Windows 10 Pro & Enterprise editions of Windows 8 Ultimate & Enterprise editions of Vista and 7 (Trusted Platform Module version 1.2 or higher is required)
To check your Windows version and confirm if you have the Bitlocker feature:
- Launch Windows File Explorer by double-clicking on its desktop shortcut icon or by pressing Windows key + E.
- Go to the ‘This PC’ page.
- Now, either right-click anywhere on the blank space and select Properties from the context menu or click on System Properties present on the ribbon.
Confirm your Windows edition on the following screen. You can also type winver (a Run command) in the start search bar and press the enter key to check your Windows edition.
Next, your computer also needs to have a Trusted Platform Module (TPM) chip on the motherboard. The TPM is used by Bitlocker to generate and store the encryption key. To check if you have a TPM chip, open the run command box (Windows key + R), type tpm.msc, and press enter. In the following window, check the TPM status.
On some systems, TPM chips are disabled by default, and the user will need to enable the chip manually. To enable TPM, restart your computer and enter the BIOS menu. Under Security settings, look for the TPM subsection and will allow it by ticking the box next to Activate/Enable TPM. If there is no TPM chip on your motherboard, you can still enable Bitlocker by editing the “Require additional authentication at startup” group policy.
How to Enable and Set Up BitLocker Encryption on Windows 10
Bitlocker can be enabled using its graphical interface found inside the control panel or executing a few commands in the Command Prompt. Enabling Bitlocker on Windows 10 from either is very simple, but users generally prefer the visual aspect of managing Bitlocker via the Control Panel rather than the command prompt.
How to Enable and Set Up BitLocker Encryption on Windows 10 Method 1: Enable BitLocker via the Control Panel Method 2: Enable BitLocker using the Command Prompt
Method 1: Enable BitLocker via the Control Panel
Setting up Bitlocker is pretty straight-forward. One only needs to follow the on-screen instructions, choose their preferred method to encrypt a volume, set a strong PIN, safely store the recovery key, and let the computer do its thing.
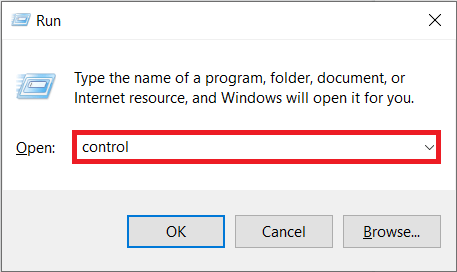
Press Windows key + R to open the Run Command box, type control or control panel, and press enters to launch the Control Panel.
For a few users, the Bitlocker Drive Encryption will itself be listed as a Control Panel item, and they can directly click on it. Others can find the entry point to the Bitlocker Drive Encryption window in System and Security.
Expand the drive you want to enable Bitlocker to click on the Turn on Bitlocker hyperlink. (You can also right-click on a drive in File Explorer and select Turn On Bitlocker from the context menu.)
If your TPM is already enabled, you will directly be brought to the BitLocker Startup Preferences selection window and can skip to the next step. Otherwise, you will be asked to prepare your computer first. Go through the Bitlocker Drive Encryption startup by clicking on Next.
Before you turn off the computer to enable TPM, make sure to eject any connected USB drives and remove any CDS/DVDs sitting idle in the optical disc drive. Click on Shutdown when ready to continue.
Turn on your computer and follow the instructions that appear on the screen to activate the TPM. Activating the module is as simple as pressing the requested key. The key will vary from manufacturer to manufacturer, so carefully read the confirmation message. The computer will most likely shut down again once you activate the TPM; turn on your computer back on.
You can either choose to enter a PIN at every startup or connect a USB/Flash drive (Smart Card) containing the startup key every time you want to use your computer. We will be setting a PIN on our computer. If you decide to move forward with the other option, do not lose or damage the USB drive bearing the startup key.
On the following window set a strong PIN and re-enter it to confirm. The PIN can be anywhere between 8 to 20 characters long. Click on Next when done.
Bitlocker will now ask you your preference for storing the recovery key. The recovery key is extremely important and will help you access your files on the computer in case something deters you from doing so (for example – if you forget the startup PIN). You can choose to send the recovery key to your Microsoft account, save it on an external USB drive, save a file on your computer or print it.
We recommend you print the recovery key and store the printed paper safely for future needs. You might also want to click a picture of the paper and store it on your phone. You never know what will go wrong, so it is better to create as many backups as possible. Click on Next to continue after you have printed or sent the recovery key to your Microsoft account. (If you choose the latter, the recovery key can be found here: https://onedrive.live.com/recoverykey)
Bitlocker gives you the option to either encrypt the entire hard drive or only the part used. Encrypting a complete hard drive takes longer to accomplish and is recommended for older PCs and drives where most of the storage space is already being used.
If you are enabling Bitlocker on a new disk or a new PC, you should choose to encrypt only the space that is currently filled with data as it is much faster. Also, Bitlocker will automatically encrypt any new data you add to the disk and save you the trouble of doing it manually.
Select your preferred encryption option and click on Next.
(Optional): Starting from Windows 10 Version 1511, Bitlocker started providing the option to select between two different encryption modes. Select the New encryption mode if the disk is a fixed one and the compatible mode if you are encrypting a removable hard drive or USB flash drive.
On the final window, some systems will need to tick the box next to Run BitLocker system check while others can directly click on Start encrypting.
You will be prompted to restart the computer to initiate the encryption process. Comply with the prompt and restart. Depending on the size & number of files to be encrypted and also system specifications, the encryption process will take anywhere from 20 minutes to a couple of hours to finish.
Method 2: Enable BitLocker using the Command Prompt
Users can also manage Bitlocker via the Command Prompt using the command line manage-bde. Earlier, actions like enabling or disabling auto-locking could only be performed from the Command Prompt and not the GUI.
- Firstly, ensure you are logged in to your computer from an administrator account.
- Open Command Prompt with administrator rights.
If you receive a User Account Control pop-up message requesting permission to allow the program (Command prompt) to make changes to the system, click on Yes to grant the necessary access and continue. 3. Once you have an elevated Command Prompt window in front of you, type manage-bde.exe -? and press enter to execute the command. Executing the “manage-bde.exe -?” command will present you with a list of all the available parameters for manage-bde.exe
- Inspect the Parameter List for the one you need. To encrypt a volume and turn on Bitlocker protection for it, the parameter is -on. You can obtain further information regarding the -on a parameter by executing the command manage-bde.exe -on -h.
To turn on Bitlocker for a particular drive and store the recovery key in another drive, execute manage-bde.wsf -on X: -rk Y: (Replace X with the letter of the drive you wish to encrypt and Y with the drive letter where you want the recovery key to be stored). Recommended:
How to Uninstall Avast Antivirus in Windows 10 Fix Microsoft Teams Microphone Not Working on Windows 10 How to free up RAM on your Windows 10 computer?
Now that you have enabled Bitlocker on Windows 10 and have it configured to your preference, every time you boot on your computer, you will be prompted to enter the passkey in order to access the encrypted files.