In this article, I’ll tell you how to post on Instagram from PC and laptop using free methods!
How To Post On Instagram From Computer For Free
Via Instagram Web On Desktop
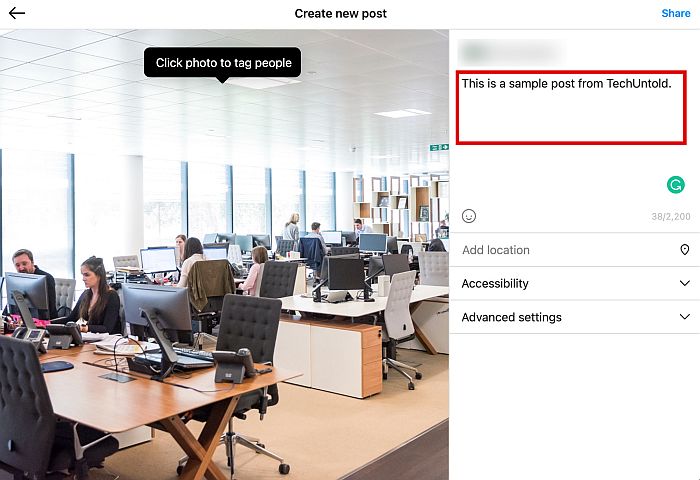
Many people don’t know this, but it’s completely possible to post on Instagram without having to go to the Instagram app. In fact, the easiest way to do this is to use the official Instagram desktop website to create a new post. Previously, this wasn’t possible, but since 2021, Instagram has made it easier for users to post directly from the desktop version of the site. This is ideal for people who take high-quality pictures using a professional camera. Instead of having to transfer the photos to their phone just to upload them to Instagram, they can now upload straight from the Instagram website on their computers or laptops. Just follow the steps below.
Via Facebook Creator Studio
One of Facebook’s best features is called the Creator Studio, which allows users who have a Facebook page to manage everything that has to do with their page in one place. The Facebook Creator Studio can show insights, messages, and other important aspects of your page. More importantly, it can help you post straight to Instagram from your desktop. The process works the same whether you’re posting to your Instagram page or your Facebook page. You can also watch this video to see how Facebook Creator Studio works for Instagram accounts. If you want to be able to schedule Instagram posts, you can also use third-party tools. Check out the best choices in this article.
A Plugin Or Dev Tools In Web Browser
When you open Instagram in your browser, you can see that it has everything available in the Instagram app, save for a few features. You can like and comment on photos, view full-size photos, view stories, or even go live. Just recently, Instagram has also started allowing people to use Instagram Direct from the browser. And luckily, now Instagram allows users to post images via the browser. However, we know that in the past, this feature was not always available. At some point, Instagram simply disabled it. In case Instagram does it again, there is a way to get around this, and it’s through a function called “user-agent spoofing.” With user-agent spoofing, you’re effectively fooling Instagram into thinking that you’re accessing its browser version with your mobile device, where uploading photos is possible. This makes it possible for you to post right from your computer.
Google Chrome (Video)
If you’re a Chrome user, you can download free browser plugins, like Desktop for Instagram or UserAgent Switcher. Both of these plugins are available at no cost to you in the Chrome Store. Watch this video to see how to do it:
Safari on Mac
Here are the steps for enabling user-agent spoofing on Safari:
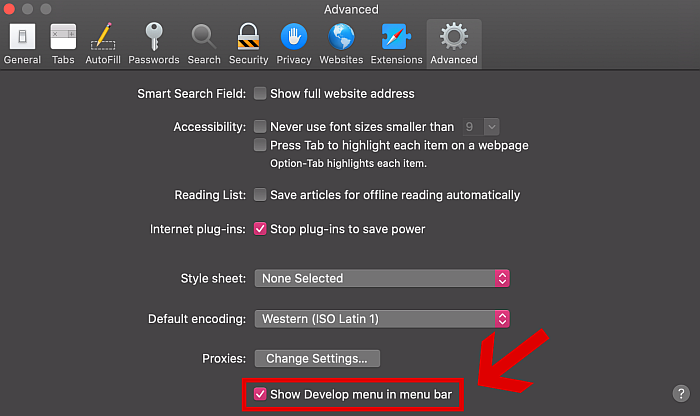
- First, make sure that you have the Develop tab enabled. If you don’t see it on the menu, enable it first by going to Preferences.
- Click Advanced. Click on the last option, “Show Develop menu in menu bar.”
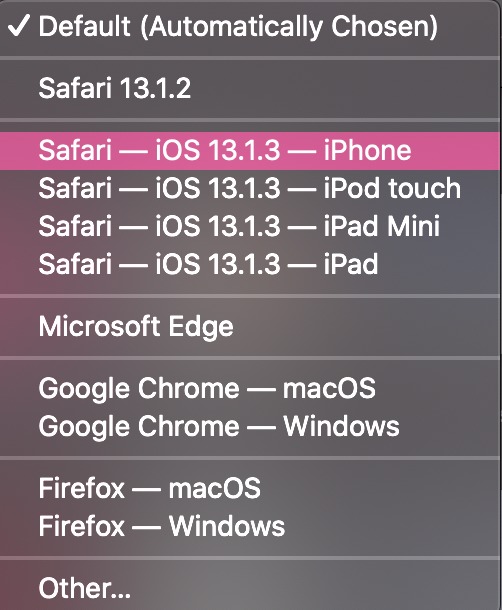
- You should now see the Develop tab on the menu. Click it and hover your mouse over User Agent.
- A new menu should show up. You can now see all the device options you have for user-agent spoofing. For this trick to work, you have to choose a mobile browser, like Safari on iPhone, iPod Touch, or iPad.
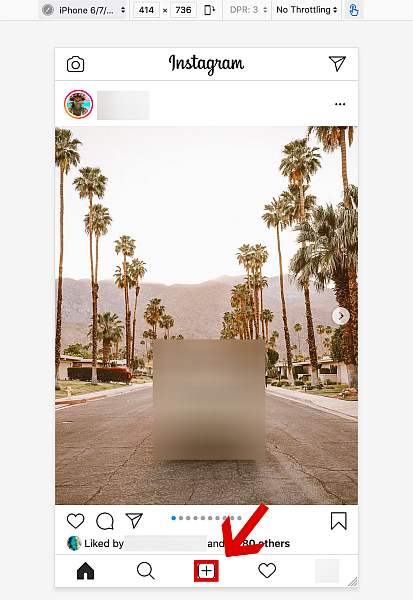
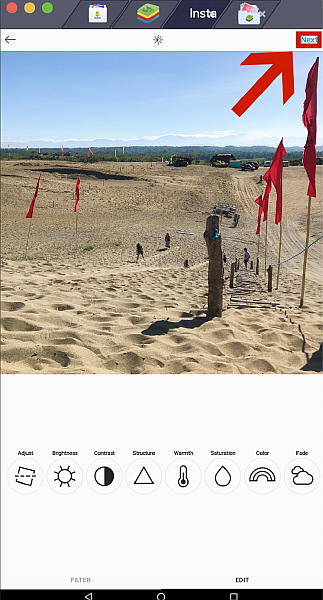
- The page should refresh, and the new page should have the camera button at the bottom. You can now upload photos directly from your computer for free. Here’s how you can do it on Mozilla Firefox:
- Click Tools on the menu, then hover your mouse over Web Developer. A new menu should pop up. Click on Responsive Design Mode.
- Just like in Safari, a new dropdown menu showing all the available device options will open. You can choose whatever device you like since they’re all mobile anyway.
- After choosing the device, refresh the page. You should now be able to see the camera button and upload the photo of your choosing. As you can see, you do have to jump through a few hoops before you can enable this function, but the upside is that it’s completely free. Also, once you figure out how to do it, it’s the easiest way to upload an Instagram post from your computer or laptop. It isn’t without its limitations, though. One, you can’t use filters or tags on the photo. You also can’t edit captions once the photo is already published. The biggest draw for many people, however? You can only upload one photo per post. If you want to upload multiple photos, you have to look elsewhere.
Uplet App for PC and Mac
Uplet is an easy-to-use app for Mac and, soon, PC. As mentioned above, the browser method only allows single photo uploads. Uplet, however, allows multiple photo uploads. You can upload up to 10 photos per post, the same limit on Instagram mobile. Regardless of how many photos you choose to include in a single post, the quality remains the same. In addition to this, Uplet is extremely lightweight, which means you don’t need to have a high-end PC to get this app to work. Another interesting feature is that Uplet can work with multiple Instagram accounts at the same time. Switching is as easy as selecting another tab from the menu. The Uplet app works the same for both Mac and PC. Just open your IG account with the app and select the images or videos you want to upload. All of these photos are editable to some extent – you can crop the photos and add captions, but you can’t add filters yet, as of this writing. Here’s a more detailed guide to using Uplet:
- Download the app from the official Uplet website and install it on your computer or laptop.
- Sign in with your Instagram account.
- You will see a window with “Add Photos and Videos” in the middle. Click that button.
- A new window will open, showing the folders on your PC. Select all the photos that you want to upload.
- You will now see various options. You can click Add Caption to write a caption for the photo set, or change the dimensions of the photos. Once you’re done, click Share All to upload the photos to your Instagram account instantly. As mentioned above, if you have multiple accounts, you can also add them all to Uplet. To add user profiles, go to the menu and click Uplet > Accounts > Add an account. Interested in Uplet for Mac and PC? Check it out at Uplet’s official website now. Currently, only the Mac app is available for download, but you can already enter your email address to receive updates about the PC version.
Bluestacks
Bluestacks is a free computer software that allows you to run native Android apps from your desktop computer. It’s a lot like having a virtual mobile device on your desktop itself, especially since it comes with Play Store already preinstalled. With Bluestacks, you can run your favorite Android apps directly from your Mac or PC, including Instagram. You can do almost everything you can do on the Instagram mobile app using Bluestacks, such as commenting on photos, viewing and posting stories, sending Instagram Direct messages, and of course, uploading photos. Currently, the only thing you really can’t do is upload IGTV videos. It does come with a few downsides, though. First, the latest Bluestacks version can only run Android KitKat (4.4.2). Since there are some apps that are no longer compatible with older Android versions, it does limit the apps that you can download on your computer. If you need something more advanced, you’re going to have to follow an entirely different process by downloading the Android SDK instead. Or take a look at these Bluestack alternatives. That said, if you’re only using Bluestacks for Instagram, this shouldn’t be a problem. That’s because, as of this writing, Instagram is still compatible with Android KitKat. This brings us to the next downside, which is the system requirements of Bluestacks. If you’re a casual user who’s only planning to use Bluestacks for Instagram, it’s probably not the best idea. In order to run Bluestacks, you should have at least 2GB of RAM, 5GB of HDD space, and any modern Intel or AMD processor. And that’s only the minimum. The recommended build in order to run Bluestacks is 8GB of RAM, 5GB of SSD space, a multi-core Intel or AMD processor with a PassMark score of at least 1000, and a dedicated graphics card with a PassMark score of at least 750. In short, it’s a very demanding app that may not be suitable for casual Instagram users. The good thing is, these issues shouldn’t hinder you too much from using Instagram from your desktop, unless of course, if your computer can’t support the minimum requirements. But if you’re looking for the best alternative to using Instagram on desktop, Bluestacks is still up there on the list. Ready to install and use Bluestacks? Without further ado, here are the steps for posting photos on Instagram from your laptop or PC using Bluestacks.
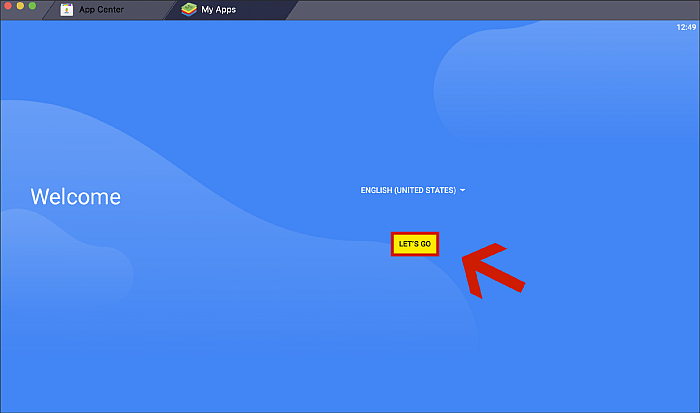
- Before you can use Bluestacks, you first have to sign in to your Google Account.
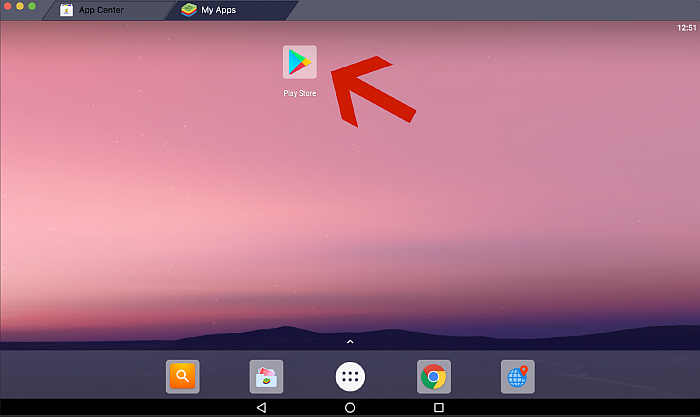
- Welcome to your new virtual mobile. As you can see, it looks exactly the same as the home screen on your phone. It comes preinstalled with the Google Play Store, too. Click the Play Store icon to begin.
- Google Play Store will load in another tab. Go to the search bar and type Instagram. Download and install the app.
- Once it’s done, click “Open” to launch the app.
- A new tab will pop-up showing Instagram. Log in using your Instagram details.
- That’s it. You can now use Instagram from your PC or laptop the same way that you would use the mobile app. Now that you’ve set up Instagram on Bluestacks, it’s time to start using it. Here’s how to post photos using Bluestacks:
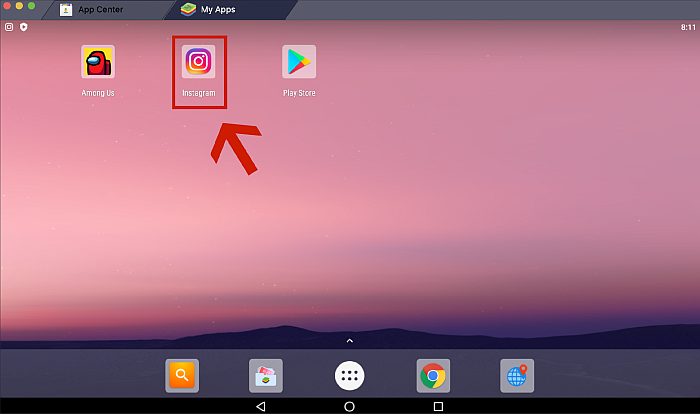
- Launch the Instagram app from your Bluestacks home screen.
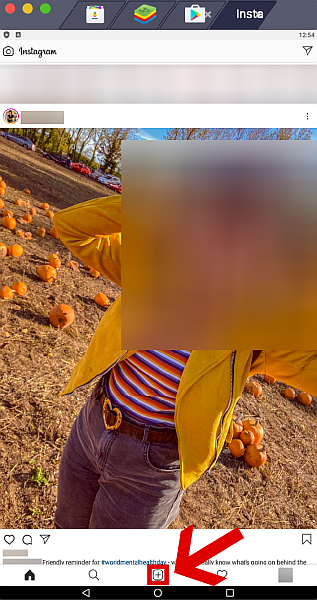
- Click on the camera (+) button at the bottom.
- You’ll see the normal options like in the mobile Instagram app. To the left, you’ll see the Gallery tab.
- At the upper left of the Gallery tab, you can see a dropdown menu. Click Other and you’ll be brought to the Media Manager tab.
- On the Media Manager tab, click Pick from Windows to select the images you want from your computer.
- Sometimes, it will say “Unable to load image.” Don’t worry, just switch to another tab and return to Media Manager. You should now see your images.
- You can also just go back to the Instagram tab. You’ll see your photo already there and ready for uploading.
- Click Next to go to the next screen. On the next few screens, you’ll be able to add filters, edit the photo, add captions, edit the location, tag people, and so on.
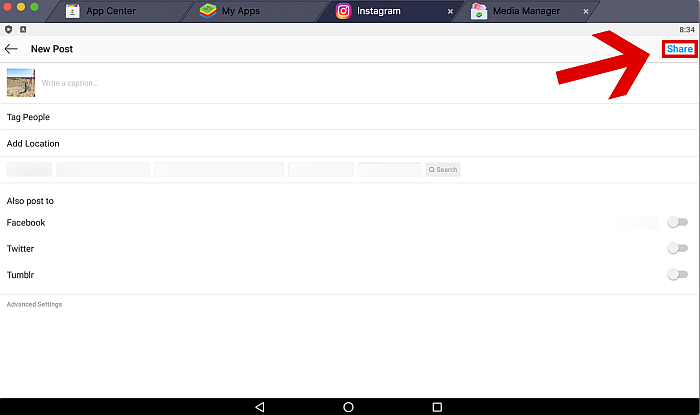
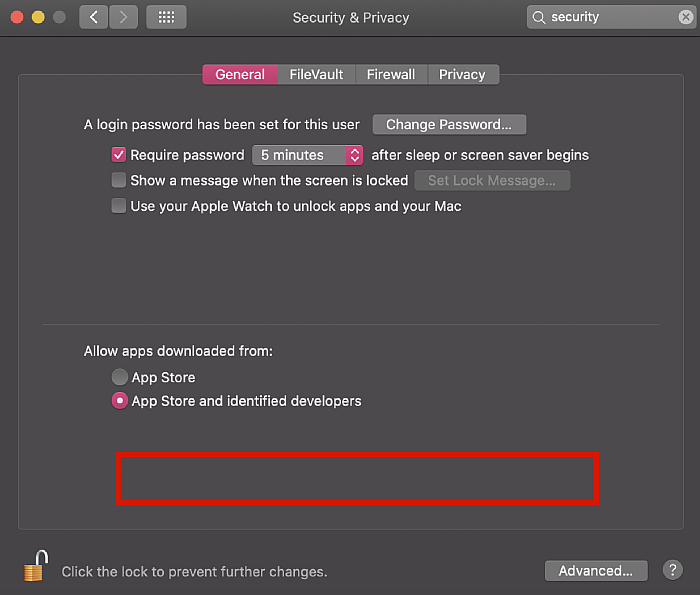
- To post your photos, just click Share at the upper right of the screen. And there you have it, you’ve now managed to post on Instagram using Bluestacks! One of the most common issues for Bluestacks on Mac is that it doesn’t boot up after installation. If it doesn’t load, make sure to go to System Preferences > Security > General and check if there’s no option saying “System software from developer ‘Bluestack Systems, Inc.’ was blocked from loading.” If there is, simply click “Allow.” Launch Bluestacks again and it should boot up properly now. Excited about using Android apps on your desktop? Download Bluestacks today!
LatelySocial.com
LatelySocial is a social media management platform that was made to keep track of all of your social networks, such as Instagram, Facebook, and Twitter. The platform has several nifty features, such as the ability to schedule posts, analyze the performance of your posts, and manage all of your social media accounts in one place. You don’t have to worry about your passwords getting hacked because the platform doesn’t store your passwords on their servers. Lastly, the app can be used literally anywhere. It’s fully functional on all web browsers and content can be easily uploaded from Dropbox or Google Drive. LatelySocial has a free version, as well as multiple paid versions. The biggest differences between these versions are the number of social media accounts you can have, the cloud storage space available to you, and the maximum file size that you can upload.
Free – 6 social media accounts, 2MB storage, 2MB file sizePersonal $9/month – 6 social media accounts, 1,000MB storage, 200MB file sizeAgency $14/month – 30 social media accounts, 2,000MB storage, 400MB file sizeEnterprise $24/month – 60 social media accounts, 3,000MB storage, 800MB file sizeBusiness $89/month – 120 social media accounts, 6,000MB storage, 1,600MB file sizeVIP $149/month – 240 social media accounts, 10,000MB storage, 2,200MB file size
When it comes to downsides, LatelySocial does have a few. One, if you’re only planning to use the platform for Instagram, then plans are a bit more expensive than the competition, considering it doesn’t even offer additional features, like audience targeting or hashtag suggestions, like other schedulers have. Two, the dashboard can be quite overwhelming for casual users, due to all the tabs and buttons on the screen. Interested in using LatelySocial to post photos straight from your desktop? Here’s a step-by-step guide on how to use this platform.
- Sign up for an account on LatelySocial. Enter your name, email address, password, and timezone.
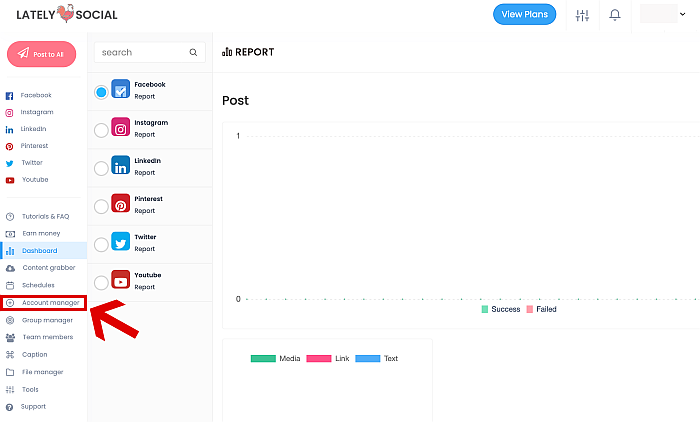
- You’ll be redirected to your Dashboard. To the left, you can see a bar with several options. Click Account Manager at the leftmost bar to add your Instagram account.
- You can see squares showing all the supported social media platforms. Click Add Account under Instagram.
- Enter your Instagram username and password. Afterward, select where you want to receive the verification code and click Add Account.
- A verification code will be sent to your chosen method. Type the code in and click Add Account again.
- Your account should now show up inside the Instagram section. Now you’re ready to start posting on Instagram using LatelySocial. Excited to make your first post? Here are the steps.
- Click Post under the Instagram tab on the leftmost bar. This will bring up a new screen.
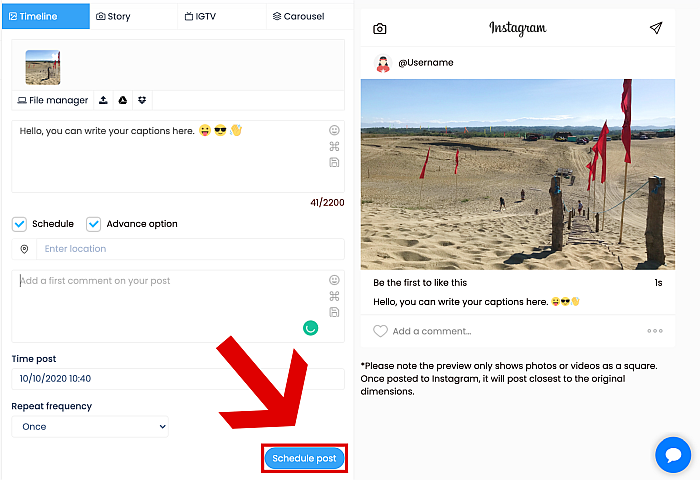
- Under Create New 1, you’ll see several options. Timeline will upload photos to your feed, Story will upload an Instagram Story, IGTV will upload a video to your IGTV, while Carousel will upload multiple photos or videos in one post. You can change your choice of upload by simply clicking on the tab. For this guide, I’ll be uploading a photo to my feed, so I’m staying on the Timeline tab.
- Once again, you have several options for uploading content. You can upload photos from your computer, your Google Drive account, or your Dropbox account just by clicking on their respective icons.
- Select the photo that you want and wait for it to upload. If you have multiple accounts, make sure that you’re scheduling under the right account by enabling the checkmark on your chosen profile in the left bar.
- You’ll then see a preview appear at the right side of the screen, which updates in real-time. You can then edit the caption or, under the Advance option, tag your photo’s location and even post the first comment. Once you’re done with your final edits, click Schedule Post.
- You can double-check all your scheduled posts by clicking the Instagram tab at the leftmost bar. LatelySocial may not seem easy to navigate and use at first. But once you get the hang of it, you’ll find that it’s a convenient way to upload high-quality photos from your computer or laptop to Instagram. Plus, you don’t really need to upgrade to a paid plan if you don’t want to. Just note that some advanced options such as turning off comments and others are not available in LatelySocial. The free plan doesn’t limit the number of posts that you can upload, so you can technically use this platform forever without paying a cent. Overall, LatelySocial is a good platform for posting photos on Instagram, especially if you also want a scheduler at the same time. Sign up now at LatelySocial’s official website!
Posting To Instagram From PC and Laptop For Free
See, there are many ways on how to post on Instagram from a laptop and PC for free. Gone are the days when you have to transfer your photos from your camera to your laptop, and finally to your phone again before being able to upload them to Instagram. Now, you can upload your best photos straight from your desktop for free! If you experience issues with posting IG photos, check out this helpful post. Did you like this article? What are your favorite methods for posting on Instagram from your desktop? Make sure to let us know your thoughts in the comments below! Save my name, email, and website in this browser for the next time I comment. Notify me of follow-up comments via e-mail.
Δ