Set Up The Game DVR
Before you begin you should open up the Xbox app and click on the cogwheel to open its Settings. Near the top, there’ll be a ‘Game DVR’ tab, and once you click on it you should see a ‘Record game clips and screenshots using Game DVR’ slider that must be toggled on.
1 Set Up The Game DVR1.1 Start Recording A Video1.2 1. Open The Game Bar1.3 2. Start Recording1.4 3. Stop Recording1.5 4. Next Steps1.6 Final Thoughts
Once that is set up you should be able to use the Game DVR as a screen recorder. If you want you can go over some of the other settings, and adjust the hotkeys to suit your preferences. More importantly, however, you may want to adjust the maximum recording time and the destination folder that the videos you capture will be saved to.
Start Recording A Video
After the Game DVR is set up, you can start recording at any time when you’re in an app or game. Unfortunately, it simply won’t work if you don’t have an app or game window open and active. All it takes to start recording is a few simple steps:
1. Open The Game Bar
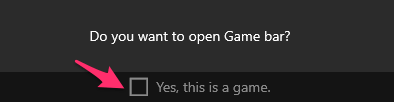
Press the Win+G shortcut on your keyboard (unless you changed it) to open the Game Bar. A dialog box should appear that asks you “Do you want to open the Game bar?” and there will be a checkbox below it to verify that “Yes, this is a game.”
Be sure to click on the checkbox, even if you’re running an app not a game – so that you can use the Game DVR to record the video.
2. Start Recording
On the Game Bar itself, you can click on the red circle (i.e. the record button) to start recording. Below it there is a checkbox that you can click on to ‘Record mic’ if you want to also record a voiceover via your microphone.
3. Stop Recording
While you’re recording a small overlay will appear in the upper-right part of your screen showing the duration of the video along with a red square icon (i.e. the stop button). When you’re done you can click on the stop button to halt the recording and save it automatically.
4. Next Steps
After you’re done you can open the Xbox app and click on the Game DVR icon to access a list of the recordings you’ve made using it. Alternatively, you could open up the destination folder directly in Windows Explorer. The only advantage of opening it in the Xbox app is that it has a few other options that you can use to trim the video or upload it to Xbox Live.
Final Thoughts
As you can see it really isn’t that complicated to use, but it is a very basic screen recorder at best and has lots of limitations. That is why if you want to really record high-quality videos you’re better off with a third-party screen recorder such as Movavi Screen Capture Studio which is the Movavi HD recorder. Still, in a pinch, it can be useful to be able to quickly capture videos from your screen using the Game DVR. Now that you know how to use it, you should try recording a video at least once to see how it works so that the next time you won’t have any difficulty recording a video when you really need to. Save my name, email, and website in this browser for the next time I comment. Notify me of follow-up comments via e-mail.
Δ